5 Stunning Paper Quilling Projects for Beginners That Anyone Can Master

Create Elegant Floral Greeting Cards
Design a Whimsical Butterfly Wall Art Piece
Craft Beautiful Monogram Gift Tags
Make Decorative Flower Pot Embellishments
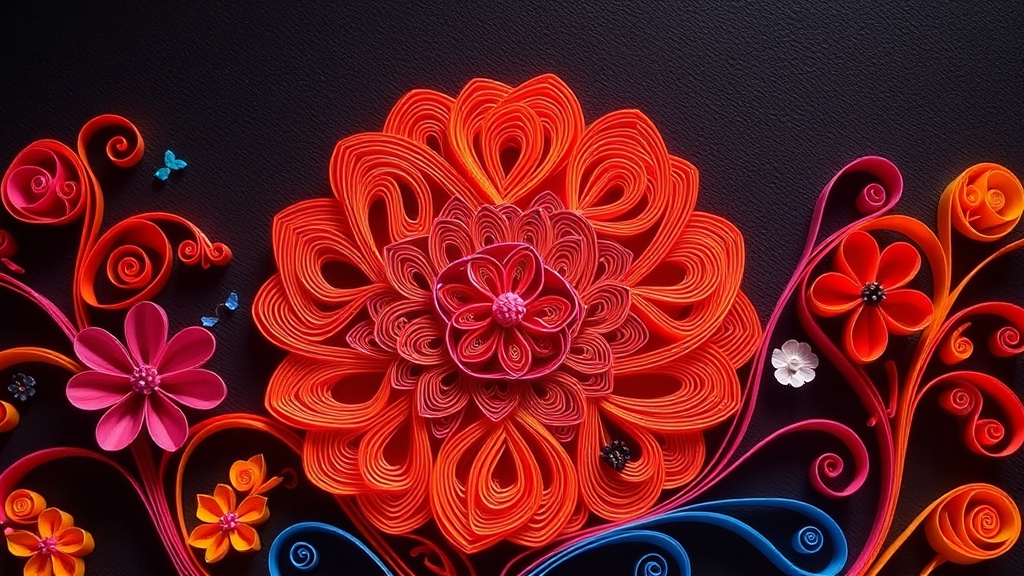
Assemble an Intricate Mandala Shadow Box
Paper quilling transforms simple strips of paper into intricate, eye-catching artwork that looks far more complex than it actually is. This post covers five beginner-friendly projects that build real skills—starting with basic coils and progressing to decorative pieces you'll actually want to display. No expensive equipment required. No prior art experience needed. Just paper, glue, and a willingness to try something new.
What Exactly Is Paper Quilling?
Paper quilling (also called paper filigree) is the art of rolling, shaping, and gluing thin strips of paper to create decorative designs. The technique dates back to the Renaissance—nuns and monks used gilded paper from bookbinding scraps to decorate religious objects. Today, it's an accessible craft with modern tools and pre-cut paper strips that make starting simple.
The basic supplies are minimal: quilling paper strips (typically 1/8 inch or 1/4 inch wide), a slotted or needle quilling tool, craft glue, and a work board. Brands like Quilled Creations and Paplin offer starter kits that include everything for under $25. Here's the thing—you don't need the fanciest tools to begin. A toothpick and paper cut from old magazines work in a pinch.
Most beginners master the basic coil within an hour. The real magic happens when you start pinching those coils into shapes—teardrops, marquises, squares—that fit together like puzzle pieces.
What Supplies Do Beginners Actually Need?
You'll need four basics: paper strips, a rolling tool, adhesive, and a surface to work on. Everything else is optional.
The market offers overwhelming choices. Skip the analysis paralysis. Start with a mid-range kit—something like the Quilled Creations Beginner Kit—and upgrade individual components as skills develop. Cheap paper tears easily. Premium paper (hand-cut or specialty textures) isn't necessary until you're selling pieces or gifting framed work.
| Supply | Budget Option | Recommended Upgrade | Price Range |
|---|---|---|---|
| Paper strips | DIY cut from cardstock | Quilled Creations 1/8" strips | $0–$12 |
| Quilling tool | Slotted plastic tool (included in kits) | Corsini stainless steel needle tool | $3–$18 |
| Adhesive | Elmer's School Glue | Beacon 3-in-1 Advanced Craft Glue | $2–$8 |
| Work surface | Wax paper over cardboard | Quilling work board with sizing circles | $0–$15 |
| Storage | Ziplock bags | ArtBin Solutions box | $1–$22 |
Worth noting: the work board with circle templates helps enormously with consistent sizing. Uniform coils make professional-looking pieces. Eyeballing works—but your teardrops will vary, and the finished design suffers.
Project 1: Basic Flower Motifs
Flowers teach the foundational shapes. Every quiller—beginner or advanced—returns to floral designs because they're forgiving and versatile.
Start with a simple five-petal flower. Roll five loose coils (paper rolled without tight tension), pinch one end of each to create teardrops, and arrange them in a circle. Add a tight coil center. That's it.
The beauty here? Imperfection looks organic. Real petals aren't identical. Your slightly uneven teardrop becomes "whimsical character" rather than "mistake." Glue the finished flower to a blank greeting card—Strathmore watercolor cards handle the dimensional quilling well—and you've got a handmade card that beats anything from Hallmark.
Try variations once the basic shape feels natural. Marquise petals (pinched at both ends) create daisy-like flowers. Square petals give a geometric, modern look. Combine shapes within one flower for visual interest.
Project 2: Monogram Letter Art
Monograms make excellent gifts—and they're surprisingly straightforward. The letter itself provides structure; you just fill it with quilled shapes.
Print a large letter (8–10 inches tall) from your computer. This becomes your template. Slide wax paper over it and build your quilled design on top. The wax paper prevents sticking, and the letter underneath keeps proportions correct.
Fill the letter solidly with tight coils for a textured look. Or outline the letter with a continuous strip and fill the interior with contrasting shapes—teardrops, crescents, scrolls. The contrast between filled and empty space creates visual rhythm.
The catch? Monograms require patience. A single letter might take three hours. But the result—professional wall art personalized to a name—justifies the time. Frame finished pieces in Michaels' float frames (the depth accommodates dimensional quilling) for display-ready gifts.
How Long Does Paper Quilling Art Last?
Quilled paper art lasts decades when properly sealed and displayed. The paper itself is acid-free (quality quilling strips are archival-grade), and dimensional pieces stay intact if protected from dust, moisture, and direct sunlight.
Sealing extends lifespan significantly. Unsealed quilling collects dust in crevices—impossible to clean without damage. A light spray of Krylon Gallery Series UV-Resistant Clear Acrylic Coating protects without adding visible gloss. For pieces in frames, glazing (glass or acrylic) does the work.
Humidity is the enemy. Paper expands and contracts, loosening glued joints. Display quilling away from bathrooms, kitchens, and exterior walls in humid climates. That said, normal home humidity (40–60%) poses minimal risk to sealed pieces.
Project 3: Quilled Earrings
Jewelry transforms quilling from home decor to wearable art. Earrings work particularly well—they're small, lightweight, and impressively detailed.
Make matching domes by rolling tight coils, shaping them into slight cups using a round tool handle (the end of your slotted tool works), and sealing thoroughly. Multiple layers of clear nail polish or jewelry resin create durability. Add earring hooks from Fire Mountain Gems—hypoallergenic surgical steel runs about $3 for 20 pairs.
Design possibilities expand with size. Tiny 1/2-inch studs feature simple spirals. Dangles up to 2 inches incorporate complex combinations—scrolls, beehive coils, fringed flowers. The weight remains negligible (paper jewelry is genuinely comfortable for all-day wear), and the handmade story starts conversations.
One practical tip: coat jewelry pieces heavily. Earrings face more handling and environmental exposure than wall art. Five thin layers of sealant beat two thick ones—thick coats pool and yellow.
Project 4: Decorative Mandalas
Mandalas combine repetition and symmetry into meditative, display-worthy pieces. They're more structured than freeform flowers but still accessible to beginners.
Work on a printed mandala template (plenty available free from Printablee or quilling pattern books). The template ensures symmetry—you build identical sections that radiate from center.
Start from the middle and work outward. The center is typically a tight coil or compound shape. Each subsequent ring uses different shapes—perhaps teardrops pointing outward, then marquises, then crescents. The pattern repeats eight times around the circle.
Mandalas look complex. They're actually methodical. Make all eight teardrops before gluing any. Arrange them dry first. When the layout satisfies, glue one section completely, then use it as anchor for the remaining seven. This prevents the "drifting" that ruins symmetry.
Finished mandalas measure 6–12 inches and suit framing or mounting on canvas panels. The dimensional shadows they cast add depth that photographs beautifully—Instagram-worthy craft content, if that's your thing.
Project 5: 3D Miniature Scenes
Once flat projects feel comfortable, dimensional work opens new territory. Miniature scenes—tiny teacups, plant pots, fruit baskets—showcase quilling's sculptural potential.
The technique differs: instead of gluing shapes flat, you build upright structures. A miniature cup starts with a tight coil base, adds vertical strips for walls, and finishes with a fringed strip for rim texture. Scale stays small (2–3 inches tall) because paper supports only limited weight.
Scheherezade Quilling Papers—available through Custom Quilling—offer extra-length strips that reduce joints in large 3D pieces. Regular 17-inch strips work for smaller items.
These miniatures make exceptional gifts. A quilled succulent in a real 2-inch terracotta pot requires no watering, never dies, and occupies desk space charmingly. Group three miniature pieces on a small shelf for curated impact.
What Mistakes Do Beginners Make Most Often?
Three errors derail beginners: using too much glue, rolling inconsistent coils, and rushing the drying process.
Glue should be invisible. A tiny dot bonds paper strips—excess squeezes out, creates shiny spots, and attracts dust. Apply with a toothpick, not the bottle tip. If you see glue, you've used too much.
Consistent sizing matters more than perfect tension. Some coils should be tight, others loose—varied sizes create visual interest. But five teardrops meant to match must actually match. The work board's circle guides help enormously here.
Drying can't be rushed. Moving a partially dried piece stretches shapes or breaks bonds. Quilling suits multitasking: roll coils during a podcast, glue sections during commercial breaks, assemble when fully dry. A single complex piece might span several days—and that's normal.
The learning curve rewards persistence. First attempts look wobbly. By project five, control improves noticeably. By project twenty, you're explaining technique to friends who can't believe it's "just paper."
Start with the flower. Gift the monogram. Wear the earrings. Display the mandala. Eventually, build the miniature scene. Each project builds capability—and a portfolio of handmade pieces that cost pennies in materials but deliver genuine creative satisfaction.