Making Marbled Paper with Homemade Ink

Most people think you need expensive, synthetic chemical pigments to achieve professional-grade marbled paper. They assume that if you aren't buying a pre-made kit from a specialty art store, your results will look muddy or amateur. That's simply not true. Marbling is a game of surface tension and pigment density, not brand names. This post covers the process of creating your own pigments from scratch and using them to create intricate, swirling patterns on paper using the traditional "hydrographic" method. You'll learn how to manipulate homemade ink and carrageenan water to produce high-end stationery without a massive budget.
What Materials Do I Need to Make Homemade Ink?
You need a base liquid, a pigment source, and a binding agent to create a functional ink. For this specific method, we aren't just making thin watercolors; we're making a heavy, pigment-rich ink that can sit on top of a liquid surface without sinking. Most crafters use a combination of high-quality pigment powders and a liquid carrier like water or alcohol. If you want to go the organic route, you can actually extract color from things like beetroot or turmeric, though you'll need to stabilize them.
Here is a breakdown of the standard kit for this project:
- The Base: Carrageenan (seaweed extract) or Methyl Cellulose. This creates the "size" or the thickened water that holds the pattern.
- The Pigment: You can use dried, ground botanical matter or even high-quality charcoal.
- The Binder: Gum Arabic or even a simple egg yolk (if you're feeling experimental) helps the ink stick to the paper.
- The Tray: A shallow, rectangular plastic bin.
- The Tools: A stylus, a comb, or even a toothpick for manipulating the patterns.
If you've ever tried natural indigo dyeing with kitchen scraps, you already understand the chemistry of extracting color from organic matter. The principles are similar here, but the goal is density rather than absorption.
How Do I Prepare the Marbling Liquid?
To prepare the marbling liquid, you must dissolve carrageenan powder into warm water and let it sit until it reaches a gelatinous consistency. This is the foundation of your work. If the liquid is too thin, your ink will sink; if it's too thick, the paper won't pick up the design.
I usually use Irish Moss or a standard carrageenan powder from a health food store. It's a bit of a process—don't skip the resting period. You'll want to mix the powder into the water, stir it thoroughly, and then let it sit for at least 24 hours. This ensures all the air bubbles have escaped. If you have bubbles, your paper will have holes in the design. It's a small detail, but it's the difference between a piece of art and a piece of trash.
Once the liquid is clear of bubbles, it's ready for the ink. Here's a quick comparison of the two most common ways to thicken your "size":
| Method | Texture | Ease of Use |
|---|---|---|
| Carrageenan | Gel-like, heavy | Requires 24-hour rest |
| Methyl Cellulose | Slippery, light | Fast-acting |
| Cornstarch Slurry | Viscous, thick | Requires heating |
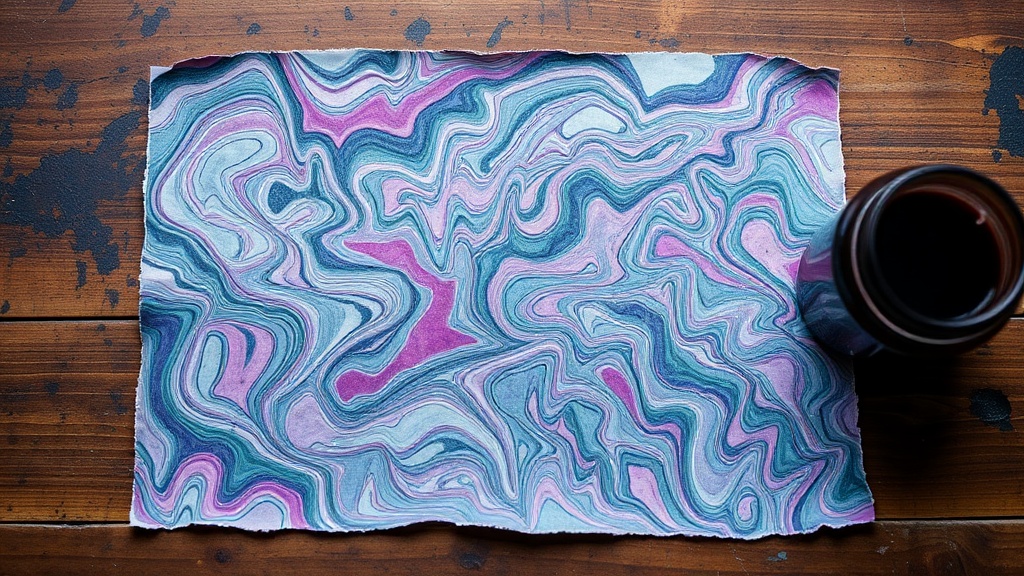
How Do I Create the Ink Patterns?
You create the patterns by dropping your homemade ink onto the surface of the thickened liquid and then manipulating it with tools. This is where the magic happens. You aren't just "painting"; you're manipulating surface tension. Each drop of ink interacts with the size in a specific way.
First, prepare your ink. If you're using a botanical pigment, make sure it's ground into a fine enough powder that it won't clump. I like to use a dropper to add the ink to the tray. Drop one color, wait a second, then drop the next. This creates a layered effect. Once the colors are floating, take a stylus or a fine-tipped tool and swirl them. You can make loops, zig-zags, or even "S" shapes. (Just don't overwork it—if you stir too much, you'll just end up with a muddy brown mess.)
The catch? You have to be decisive. If you spend too much time hovering over the tray, the ink might start to settle or lose its edge. Move quickly and with intention.
- Drop: Add your first color of ink to the tray.
- Layer: Add the second and third colors.
- Swirl: Use your tool to create the pattern.
- Lay: Gently lay your paper onto the surface.
- Lift: Lift the paper straight up to avoid smearing.
The paper needs to be slightly damp to absorb the ink properly. If the paper is bone-dry, the ink might just sit on top and peel off once it dries. A quick misting with a spray bottle can help, but don't drown it. We're looking for a subtle dampness, not a puddle.
One thing to watch out for is the temperature of your workspace. If it's too hot, the liquid might thin out too much. If it's too cold, the pigments might clump. A consistent, room-temperature environment is your best friend here.
After you lift the paper, place it on a drying rack or a clean sheet of parchment paper. Don't try to move it around while it's wet. Let it sit until it's completely dry before you even think about touching it or trying to frame it. Patience is a requirement for this craft. It's frustrating, I know, but it's worth the wait for a clean finish.
If you find yourself getting interested in the technical side of materials, you might enjoy looking into how professional ceramicists handle pigments. While it's a different medium, the way they manipulate mineral density is very similar to what we're doing here with the carrageenan. It's a different kind of heat, but the physics of color and weight are nearly identical.
Once your paper is dry, you can use it for many things—journals, greeting cards, or even as a decorative element in a scrapbooking project. The textures you can achieve with homemade ink are far more organic and "alive" than anything you'll find in a store-bought kit. It's a bit of a learning curve, but once you get the hang of the ink density, you'll never go back to the cheap stuff.
Steps
- 1
Prepare the Size Liquid
- 2
Mix Your Pigments
- 3
Drop the Ink onto the Surface
- 4
Swirl the Pattern
- 5
Lay the Paper and Dry